 PUGHx2
PiWheezySqueezyTouch
This page is deprecated
There is a much simpler way of achieving the same goal using piCorePlayer, freeware. I have left this page available for those who might, for whatever reason, wish to follow a similar course.
N.B. Rasbian has moved on since this was written, the current version may [or may not] behave in the same way !
A disclaimer, this is not all my own work, I am but a dwarf standing of the shoulders of giants.
This page briefly explains how an equivalent to the late lamented Squeezebox Touch can be build for relative peanuts, given that even if you could find one it would now cost at least twice as much as this solution.
What you will need :
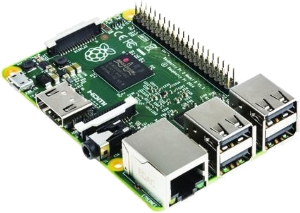 A suitable Raspberry Pi
£30 / €40
A suitable Raspberry Pi
£30 / €40
 4GB SD card
£4 / €5.50
4GB SD card
£4 / €5.50
 5 volt 2 Amp power supply
£5 / €7
5 volt 2 Amp power supply
£5 / €7
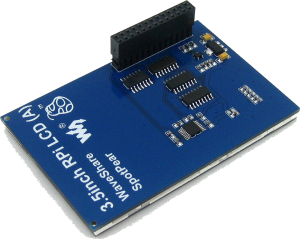 Waveshare Spotpear 3.5 inch Touchscreen with case
£20 / €28
Waveshare Spotpear 3.5 inch Touchscreen with case
£20 / €28
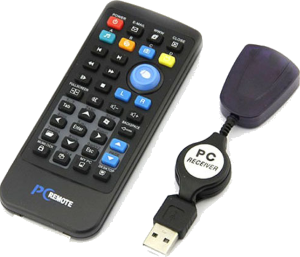 Generic remote
£6.50 / €9
Generic remote
£6.50 / €9
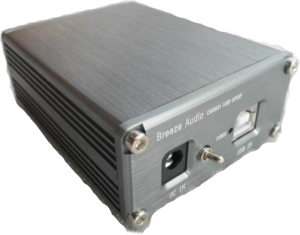 Breeze Audio CM6631 DAC
£35 / €48
Breeze Audio CM6631 DAC
£35 / €48
This tutorial was plagiarised from the following sources :
Getting Started
Create a SD card with the Raspbian image on it. Slide it into the SD card socket, connect the Raspberry Pi to a network cable, and plug in the power. Now log in using SSH (I suggest Putty). [To find the IP address use 'Advanced IP Scanner' free for Windows].
First, get rid of all the things we really do not need, removing them will save a lot of space and as, an added bonus, make the update process faster.
Remove Mathematica (460MB) and scratch (67MB)
sudo apt-get remove --purge wolfram-engine scratch
Remove Java (186MB)
sudo apt-get remove --purge oracle-java8-jdk
Remove the media player (10.7MB) and penguinspuzzle (4MB)
sudo apt-get remove --purge omxplayer penguinspuzzle
Remove un-needed python packages (10MB), and clean-up
sudo apt-get remove --purge python-pygame python-tk python3-tk sudo apt-get autoremove
Now bring your installation up-to-date
sudo apt-get update sudo apt-get upgrade sudo apt-get dist-upgrade
... and update the firmware.
sudo rpi-update
... and don't forget to reboot !
sudo reboot
Get the Waveshare Spotpear 3.5 inch LCD Touchscreen Working
To get this screen working as the main screen in landscape mode :
Launch the configuration tool
sudo raspi-config
Having deleted a lot of stuff to start with you now have absolutely no need to expand the file system - so DON'T.
Access Enable boot to Desktop, and select Desktop Log in as user 'pi'..
Enable SPI in raspi-config Advanced Options, A6 SPI, SPI interface enabled, SPI kernel loaded by default ...
... tab to Finish and reboot when prompted.
Edit /etc/modules to add the following lines at the end to describe the screen to the Frame Buffer. Beware, line 1 is very long, starting at flexfb nobacklight... and ending at height=320
sudo nano /etc/modules flexfb nobacklight regwidth=16 init=-1,0xb0,0x0,-1,0x11,-2,250,-1,0x3A,0x55,-1,0xC2,0x44,-1,0xC5,0x00,0x00,0x00,0x00,-1,0xE0,0x0F,0x1F,0x1C,0x0C,0x0F,0x08,0x48,0x98,0x37,0x0A,0x13,0x04,0x11,0x0D,0x00,-1,0xE1,0x0F,0x32,0x2E,0x0B,0x0D,0x05,0x47,0x75,0x37,0x06,0x10,0x03,0x24,0x20,0x00,-1,0xE2,0x0F,0x32,0x2E,0x0B,0x0D,0x05,0x47,0x75,0x37,0x06,0x10,0x03,0x24,0x20,0x00,-1,0x36,0x28,-1,0x11,-1,0x29,-3 width=480 height=320 fbtft_device name=flexfb speed=16000000 gpios=reset:25,dc:24
Edit /boot/cmdline.txt and add the following line at the end :
sudo nano /boot/cmdline.txt fbcon=map:1 fbcon=font:ProFont6x11
Edit /usr/share/X11/xorg.conf.d/99-fbturbo.conf to change from fb0 (HDMI output) to fb1 (LCD output).
sudo nano /usr/share/X11/xorg.conf.d/99-fbturbo.conf
... and change fb0 to fb1
Edit /boot/config.txt and add the following line at the end to describe the screen more fully:
sudo nano /boot/config.txt dtoverlay=ads7846,speed=500000,penirq=17,swapxy=1
Edit /usr/share/X11/xorg.conf.d/99-calibration.conf to add configuration information for your screen. If you are not using a Waveshare Spotpear 3.5 inch screen, please refer to the original tutorial post sited above.
sudo nano /usr/share/X11/xorg.conf.d/99-calibration.conf Section "InputClass" Identifier "calibration" MatchProduct "ADS7846 Touchscreen" Option "Calibration" "3900 240 240 3900" EndSection
At this point if you do sudo reboot you should have the raspbian front page showing on your LCD, the touchscreen should be working.
Note:You can switch between the LCD screen and an attached HDMI screen using the commands con2fbmap 1 1 to map the main console to the first framebuffer (LCD), and con2fbmap 1 0 to map the console to HDMI.
Installing Squeezelite
I suggest that you start by getting the default analogue output jack working. It is then fairly easy to modify the settings file to take account of a different output card. First set the sound level:
sudo alsamixer
Use the F6 key to select the right soundcard (if not using the default analogue output), and then set the volume using the up - down arrow keys.
Install the required libraries:
sudo apt-get install -y libflac-dev libfaad2 libmad0
Create a squeezelite “work” directory and download squeezelite:
mkdir squeezelite\ cd squeezelite wget http://squeezelite-downloads.googlecode.com/git/squeezelite-armv6hf
Move it to the usr directory, and make it executable:
sudo mv squeezelite-armv6hf /usr/bin cd /usr/bin sudo chmod a+x squeezelite-armv6hf
Now start Squeezelite
./squeezelite-armv6hf -a 80
Your Pi will now appear to 'hang'. Do not fear. Go to your Logitech Music Server and your should see a new player available. You can return to the command prompt on your Pi by pressing Ctrl-C on your SSH keyboard.
Starting Squeezelite on startup
Now make a dæmon start script to start Squeezelite, this uses a separate script for the settings, called “squeezelite_settings.sh” . Both scripts are available through Gerrelt's website, the following commands download the scripts, move them to the right directory and set the automatic start-up:
cd /home/pi/squeezelite sudo wget http://www.gerrelt.nl/RaspberryPi/squeezelite_settings.sh sudo mv squeezelite_settings.sh /usr/local/bin sudo chmod a+x /usr/local/bin/squeezelite_settings.sh
sudo wget http://www.gerrelt.nl/RaspberryPi/squeezelitehf.sh sudo mv squeezelitehf.sh /etc/init.d/squeezelite cd /etc/init.d sudo chmod a+x squeezelite sudo update-rc.d squeezelite defaults
Now modify the settings script as required using nano.
sudo nano /usr/local/bin/squeezelite_settings.sh
Search for this line if you need to change the default ALSA card settings:
SL_SOUNDCARD="sysdefault:CARD=ALSA"
and change “sysdefault:CARD=ALSA” to whatever you need for your card output, example 'front:CARD=Set,DEV=0'.
The dæmon script sets the name of the squeezelite client set to the hostname of the Raspberry, which is the most logical thing to do in my opinion. But if you do want to change it to something else then the hostname, you can set it in the settings script, so while you are editing the script, search for “SL_NAME” and change it as appropriate, removing the leading # to uncomment the line:
I would also suggest that you increase the buffer size to improve sound quality. search for SL_ALSA_PARAMS, uncomment the line (remove the hash (“#”), and increase the value to 80.Save and close the settings script file.
To test the daemon script:
sudo ./squeezelite start
The command prompt should return immediately. Now check if the squeezelite process is up:
ps -A |grep squeeze
It should return something like this (the number will be different):
2324 ? 00:00:01 squeezelite-arm
To stop squeezelite:
sudo ./squeezelite stop
You can also update squeezelite with this script. When there is a new version of squeezelite (check on the squeezelite homepage) then execute the command below which will stop squeezelite, download and update it, and start it again.
sudo ./squeezelite update
That’s it, if you now reboot the raspberry (sudo reboot), squeezelite should be started automatically.
Installing Jivelite
Install git and the following libraries:
sudo apt-get install git libsdl1.2-dev libsdl-ttf2.0-dev libsdl-image1.2-dev libsdl-gfx1.2-dev libexpat1-dev
Install and build luajit:
git clone http://luajit.org/git/luajit-2.0.git cd luajit-2.0 make sudo make install sudo ldconfig cd ..
Clone jivelite and build it:
git clone https://code.google.com/p/jivelite/ cd jivelite make cd ..
Run it,
First attach an USB keyboard to your Pi, you will need this to configure Jivelite.
If you try to run Jivelite from Putty you will get an error. Instead what you need to do is to go to your lovely shiny new LCD screen, enter terminal mode, and type in :
./jivelite/bin/jivelite
Jivelite should now start, and give you the option of selecting your required language - if this is English you are in luck as it is first in the list, otherwise your language might be hidden as Jivelite's default display size is 800 x 600.
Assuming you can select the language [highlight and press enter] it then gives you the option to change skin size. Even if you can not see the required entry this trick works. Press the down arrow on your keyboard continually for 1-2 seconds, then hit enter. You should then be able to confirm that you wish to keep the new skin - and suddenly it should look a lot more reasonable.
If all this is too difficult, attach an HDMI screen and use the trick described in the Tips and Tricks section below.
To enable Autologin :
Go back and start a new SSH session. Now ..
sudo nano /etc/inittab
Scroll down to the line :
1:2345:respawn:/sbin/getty 115200 tty1
and add a # character to the begining of the line to comment it out.
#1:2345:respawn:/sbin/getty 115200 tty1
Under this line add the following :
1:2345:respawn:/bin/login -f pi tty1 </dev/tty1 >/dev/tty1 2>&1
and save & exit.
Now start the Desktop and Jivelite :
sudo nano /etc/profile
Scroll to the bottom and add the following lines :
startx & ./jivelite/bin/jivelite
Reboot and you are done !
Be aware that analogue sound from the Raspberry Pi is, to be polite, NOT good. I strongly suggest that adding an inexpensive USB DAC will help things considerably !

The completed Pi Wheezy Squeezy Touch
Tips, Tricks and Resources
If you start an SSH session while Jivelite is running, you will get a lot of spurious messages. Entering Ctrl-C each time there is a pause will bring you back eventually to the command prompt.
The Jivelite skin selected here is for a 480 x 272 screen. The Waveshare screen is 480 x 320, but fear not I have done the work for you. Download this file, unpack it, and overwrite /home/pi/jivelite/share/jive/applets/SetupWallpaper and copy Wav35Skin to /home/pi/jivelite/share/jive/applets.
Reboot, you can now change the skin to WAV 3.5 in LCD Skin and choose a wallpaper as you wish using your touch screen - Settings - Screen
In your SSH session, you can switch between the LCD screen and an attached HDMI screen using the commands con2fbmap 1 1 to map the main console to the first framebuffer (LCD), and con2fbmap 1 0 to map the console to HDMI.
If you want to use the same DAC as I have, then to get it working you will need to edit the squeezelite settings.
sudo nano /usr/local/bin/squeezelite_settings.sh
Search for this line :
SL_SOUNDCARD="sysdefault:CARD=ALSA"
and change “sysdefault:CARD=ALSA” to "front:CARD=Set,DEV=0". If you use another DAC - Google is your friend !
A Jivelite skin and wallpapers for the Waveshare Spotpear 3.5" screen are available here.
